<?xml version="1.0" encoding="utf-8"?>
<feed xmlns="http://www.w3.org/2005/Atom" xmlns:dc="http://purl.org/dc/elements/1.1/" xmlns:thr="http://purl.org/syndication/thread/1.0">
    <title>晴れ時々曇り: 野菜づくり</title>
    <link rel="self" type="application/atom+xml" href="https://tarou.kazelog.jp/win/oniwa/atom.xml" />
    <link rel="alternate" type="text/html" href="https://tarou.kazelog.jp/win/" />
    
    <id>tag:app.kazelog.jp,2003:weblog-14434</id>
    <updated>2025-04-26T09:40:22+09:00</updated>
    <subtitle>


{
&quot;@context&quot; : &quot;https://schema.org&quot;,
&quot;@type&quot; : &quot;WebSite&quot;,
&quot;name&quot; : &quot;晴れ時々曇り&quot;,
&quot;url&quot; : &quot;https://tarou.kazelog.jp/win/&quot;
}
</subtitle>
    <entry>
        <title>レイズドベットのアスパラガスと水耕栽培から移したミニトマトにミョウガ栽培</title>
        <link rel="alternate" type="text/html" href="https://tarou.kazelog.jp/win/2025/04/post-5825.html" />
        <link rel="replies" type="text/html" href="https://tarou.kazelog.jp/win/2025/04/post-5825.html" thr:count="0" />
        <id>tag:app.kazelog.jp,2003:post-59974997</id>
        <published>2025-04-26T09:40:22+09:00</published>
        <updated>2025-07-15T09:03:47+09:00</updated>
        <summary>先日植えたアスパラガスの株の芽がこんなに大きくなりました。 ひょろひょろなので今...</summary>
        <author>
            <name>tarou</name>
        </author>
        <category scheme="http://www.sixapart.com/ns/types#category" term="レイズドベット・(野菜づくり)" />
        <category scheme="http://www.sixapart.com/ns/types#category" term="野菜づくり" />
        
        
<content type="html" xml:base="https://tarou.kazelog.jp/win/">
<![CDATA[
<div xmlns="http://www.w3.org/1999/xhtml"><p>先日植えたアスパラガスの株の芽がこんなに大きくなりました。<br />ひょろひょろなので今年の収穫はお預けです。<br />アスパラガスは大きくなるので周りに余裕を持たなくちゃいけないのですがちょっとギュウギュウです。<br />大きい株なら1年目から収穫が可能とのことでしたが、やっぱり市販の株は小さい株のしかないみたいです。<br />来年からのお楽しみです。<br />購入した株は5株入っていましたが全部芽が出てくれました。</p>
<p></p>
<p><a href="https://tarou.kazelog.jp/.shared/image.html?/photos/uncategorized/2025/04/26/0426_02.jpg" onclick="window.open( this.href, '_blank', 'width=1008,height=756,scrollbars=no,resizable=no,toolbar=no,directories=no,location=no,menubar=no,status=no,left=0,top=0' ); return false"><img class="asset  asset-image at-xid-photo-59881221" style="width: 500px; display: block; margin-left: auto; margin-right: auto;" title="0426_02" src="https://tarou.kazelog.jp/win/images/2025/04/26/0426_02.jpg" alt="0426_02" /></a></p>
<p>下の写真は水耕栽培から土上に変更したミニトマトです。<br />やっと土と屋外の環境にも順応しました。<br />今年は美味しいミニトマトが収穫出来そうです。<br />水耕栽培でミニトマトを育てて収穫するのに不安があったので抑えで屋外栽培もはじめました。</p>
<p></p>
<p><a href="https://tarou.kazelog.jp/.shared/image.html?/photos/uncategorized/2025/04/26/0426_01.jpg" onclick="window.open( this.href, '_blank', 'width=1008,height=756,scrollbars=no,resizable=no,toolbar=no,directories=no,location=no,menubar=no,status=no,left=0,top=0' ); return false"><img class="asset  asset-image at-xid-photo-59881224" style="width: 500px; display: block; margin-left: auto; margin-right: auto;" title="0426_01" src="https://tarou.kazelog.jp/win/images/2025/04/26/0426_01.jpg" alt="0426_01" /></a></p>
<p><br />先週報告したミョウガの芽も大きくなりました。<br />芽の出た数も増えて順調です。</p>
<p></p>
<p><a href="https://tarou.kazelog.jp/.shared/image.html?/photos/uncategorized/2025/04/26/0426_03.jpg" onclick="window.open( this.href, '_blank', 'width=1008,height=756,scrollbars=no,resizable=no,toolbar=no,directories=no,location=no,menubar=no,status=no,left=0,top=0' ); return false"><img class="asset  asset-image at-xid-photo-59881226" style="width: 500px; display: block; margin-left: auto; margin-right: auto;" title="0426_03" src="https://tarou.kazelog.jp/win/images/2025/04/26/0426_03.jpg" alt="0426_03" /></a></p>
<p></p></div>
]]>
</content>


    </entry>
    <entry>
        <title>野菜苗を植え付けしました。ナス・きゅうり・ピーマン・アスパラガスに挑戦。</title>
        <link rel="alternate" type="text/html" href="https://tarou.kazelog.jp/win/2025/04/post-d66a.html" />
        <link rel="replies" type="text/html" href="https://tarou.kazelog.jp/win/2025/04/post-d66a.html" thr:count="0" />
        <id>tag:app.kazelog.jp,2003:post-59972091</id>
        <published>2025-04-12T21:06:58+09:00</published>
        <updated>2025-04-12T21:10:08+09:00</updated>
        <summary>春真っ盛りですねー。 今年は桜の花をゆっくり見ることが出来ました。 桜の花が咲く...</summary>
        <author>
            <name>tarou</name>
        </author>
        <category scheme="http://www.sixapart.com/ns/types#category" term="レイズドベット・(野菜づくり)" />
        <category scheme="http://www.sixapart.com/ns/types#category" term="野菜づくり" />
        
        
<content type="html" xml:base="https://tarou.kazelog.jp/win/">
<![CDATA[
<div xmlns="http://www.w3.org/1999/xhtml"><p><a href="https://tarou.kazelog.jp/.shared/image.html?/photos/uncategorized/2025/04/12/250412_02.jpg" onclick="window.open( this.href, '_blank', 'width=1200,height=903,scrollbars=no,resizable=no,toolbar=no,directories=no,location=no,menubar=no,status=no,left=0,top=0' ); return false"></a></p>
<p><a href="https://tarou.kazelog.jp/.shared/image.html?/photos/uncategorized/2025/04/12/250412_02_2.jpg" onclick="window.open( this.href, '_blank', 'width=1200,height=903,scrollbars=no,resizable=no,toolbar=no,directories=no,location=no,menubar=no,status=no,left=0,top=0' ); return false"><img class="asset  asset-image at-xid-photo-59869167" style="width: 500px; display: block; margin-left: auto; margin-right: auto;" title="250412_02_2" src="https://tarou.kazelog.jp/win/images/2025/04/12/250412_02_2.jpg" alt="250412_02_2" /></a></p>
<p>春真っ盛りですねー。<br />今年は桜の花をゆっくり見ることが出来ました。<br />桜の花が咲くと必ずと言っていいほど花冷えになるんですよね。<br />今年も桜の花が咲いてから雨が降って冬に逆戻りして桜の花が長く見られました。<br /><br />やつと暖かくなったのでレイズドベットへ植える野菜の苗を飼って来ました。<br />写真がありません(汗)<br />毎年買っているナス・きゅうり・ピーマンと今年はアスパラガスを買ってきました。<br />アスパラガスは以前栽培していましたが、最後の頃収穫しちゃいけない時期に収穫して枯れてしまいました。<br />それまで毎年アスパラガスを庭の畑で収穫してたんです。<br />今年はアスパラガスを再度植え付けました。<br />今回はレイズドベットへ植えたので楽しみです。<br /><br /></p>
<fieldset style="border: 1px solid #66CCFF; font-size: 100%; padding: 20px;"><legend>アスパラガス</legend>アスパラガスを栽培するには、日当たりと風通しのよい場所、水はけのよい土壌が適しています。<br />また、根を広く深く張るため、広いスペースを確保必要。株間は50センチくらい空ける。<br />植え付け時期は4月中旬から5月中旬がよい。<br />肥料を好むため、5～9月の成長期に定期的に与える。<br />大きい株の場合は1年目から収穫が可能。</fieldset></div>
]]>
</content>


    </entry>
    <entry>
        <title>ニンニク栽培の実験経過報告です。　</title>
        <link rel="alternate" type="text/html" href="https://tarou.kazelog.jp/win/2025/04/post-e398.html" />
        <link rel="replies" type="text/html" href="https://tarou.kazelog.jp/win/2025/04/post-e398.html" thr:count="0" />
        <id>tag:app.kazelog.jp,2003:post-59970262</id>
        <published>2025-04-05T15:55:19+09:00</published>
        <updated>2025-04-05T15:57:04+09:00</updated>
        <summary>去年ニンニクを栽培して大収穫だったので今年もニンニクの栽培を行っています。 ニン...</summary>
        <author>
            <name>tarou</name>
        </author>
        <category scheme="http://www.sixapart.com/ns/types#category" term="野菜づくり" />
        
        
<content type="html" xml:base="https://tarou.kazelog.jp/win/">
<![CDATA[
<div xmlns="http://www.w3.org/1999/xhtml"><p><br />去年ニンニクを栽培して大収穫だったので今年もニンニクの栽培を行っています。<br />ニンニクは連作障害の恐れがあるのでプランターなどで栽培しています。<br />皆さんもご存じの様にニンニクは1個から何個にも分かれているので、数個植えようとするとかなりの数になります。なので今年も数多く植えています。<br /><br />すぐ下の写真はプランターで栽培している物です。<br />その下は試験的にペットボトルで出来ないか実験を行っている物です。<br />これまでの経過からやっぱり小さなペットボトルでは成長のスピードが遅いです。<br />ニンニクは葉の先が枯れても真ん中の芯が元気なら大丈夫みたいです。<br /><br /></p>
<p></p>
<p><a href="https://tarou.kazelog.jp/.shared/image.html?/photos/uncategorized/2025/04/04/0404_04.jpg" onclick="window.open( this.href, '_blank', 'width=640,height=480,scrollbars=no,resizable=no,toolbar=no,directories=no,location=no,menubar=no,status=no,left=0,top=0' ); return false"><img class="asset  asset-image at-xid-photo-59862250" style="width: 500px; display: block; margin-left: auto; margin-right: auto;" title="0404_04" src="https://tarou.kazelog.jp/win/images/2025/04/04/0404_04.jpg" alt="0404_04" /></a></p>
<p></p>
<p><a href="https://tarou.kazelog.jp/.shared/image.html?/photos/uncategorized/2025/04/04/0404_05.jpg" onclick="window.open( this.href, '_blank', 'width=640,height=480,scrollbars=no,resizable=no,toolbar=no,directories=no,location=no,menubar=no,status=no,left=0,top=0' ); return false"><img class="asset  asset-image at-xid-photo-59862252" style="width: 500px; display: block; margin-left: auto; margin-right: auto;" title="0404_05" src="https://tarou.kazelog.jp/win/images/2025/04/04/0404_05.jpg" alt="0404_05" /></a></p>
<p><br /><br /></p>
<fieldset style="border: 1px solid #66CCFF; font-size: 100%; padding: 20px;"><legend>ニンニク連作障害について</legend>ニンニクは連作が可能です。ただし、極端な連作をすると土壌病害や害虫が増加するなどの連作障害が発生する可能性があります。<br /><br />【対　策】<br />①土壌の消毒を行う。<br />②ほかの作物の栽培を間に入れて栽培をする。<br />③土壌改良（堆肥の投入やリン酸分・石灰分の施用など）する。</fieldset></div>
]]>
</content>


    </entry>
    <entry>
        <title>サニーレタス2回目収穫　収穫後にレイズドベットへ移植</title>
        <link rel="alternate" type="text/html" href="https://tarou.kazelog.jp/win/2025/03/2-487f.html" />
        <link rel="replies" type="text/html" href="https://tarou.kazelog.jp/win/2025/03/2-487f.html" thr:count="0" />
        <id>tag:app.kazelog.jp,2003:post-59964628</id>
        <published>2025-03-06T16:00:30+09:00</published>
        <updated>2025-03-06T16:11:03+09:00</updated>
        <summary>サニーレタスが伸びに伸び切ってしまいました。 大きくなり過ぎて室内に置いておく場...</summary>
        <author>
            <name>tarou</name>
        </author>
        <category scheme="http://www.sixapart.com/ns/types#category" term="水耕栽培" />
        <category scheme="http://www.sixapart.com/ns/types#category" term="野菜づくり" />
        
        
<content type="html" xml:base="https://tarou.kazelog.jp/win/">
<![CDATA[
<div xmlns="http://www.w3.org/1999/xhtml"><p>サニーレタスが伸びに伸び切ってしまいました。<br />大きくなり過ぎて室内に置いておく場所が無くなり今日2回目の収穫となりました。<br />水耕栽培で場所を取るのは「葉物野菜です」、次の品種の水耕栽培が置けなくなってしまったためサニーレタスは収穫後にレイズドベッド行きとなりました。<br />サニーレタスは根の部分を残しておくとまたすくすくと伸びてきます。<br />レタスは水耕栽培に適していると思います。逆に二十日大根は不向きです。<br />根もの野菜はやっぱり土に植えないと成長が偏ってしまいます。<br /><br />下の写真は前回水耕栽培からレイズドベットに移された(間引き)の二十日大根と前回収穫したサニーレタスです。屋外でもレタスは成長しています。</p>
<p></p>
<p><a href="https://tarou.kazelog.jp/.shared/image.html?/photos/uncategorized/2025/03/06/36_01.jpg" onclick="window.open( this.href, '_blank', 'width=640,height=480,scrollbars=no,resizable=no,toolbar=no,directories=no,location=no,menubar=no,status=no,left=0,top=0' ); return false"><img class="asset  asset-image at-xid-photo-59839963" style="width: 320px; display: block; margin-left: auto; margin-right: auto;" title="36_01" src="https://tarou.kazelog.jp/win/images/2025/03/06/36_01.jpg" alt="36_01" /></a></p>
<p>間引きした二十日大根ははじめは枯れそうでしたが昨日の雪にも負けづ立ち直りました。<br />真ん中の植えていない所にはジャガイモがすでに植えてあります。<br />下の写真は雪で潰れそうだったビニールトンネルの写真です。<br />ビニールトンネルの中に見えるのは春菊です。</p>
<p></p>
<p><a href="https://tarou.kazelog.jp/.shared/image.html?/photos/uncategorized/2025/03/06/36_02.jpg" onclick="window.open( this.href, '_blank', 'width=806,height=604,scrollbars=no,resizable=no,toolbar=no,directories=no,location=no,menubar=no,status=no,left=0,top=0' ); return false"><img class="asset  asset-image at-xid-photo-59839973" style="width: 320px; display: block; margin-left: auto; margin-right: auto;" title="36_02" src="https://tarou.kazelog.jp/win/images/2025/03/06/36_02.jpg" alt="36_02" /></a></p>
<p></p></div>
]]>
</content>


    </entry>
    <entry>
        <title>じゃがいもの植え付け　「ポテトチップス」用じゃがいもらしいんです。</title>
        <link rel="alternate" type="text/html" href="https://tarou.kazelog.jp/win/2025/03/post-4f49.html" />
        <link rel="replies" type="text/html" href="https://tarou.kazelog.jp/win/2025/03/post-4f49.html" thr:count="0" />
        <id>tag:app.kazelog.jp,2003:post-59963689</id>
        <published>2025-03-02T22:35:57+09:00</published>
        <updated>2025-03-03T09:37:52+09:00</updated>
        <summary>じゃがいも種の準備 2月も中旬になりそろそろジャガイモの植え付けをと準備して決行...</summary>
        <author>
            <name>tarou</name>
        </author>
        <category scheme="http://www.sixapart.com/ns/types#category" term="野菜づくり" />
        
        
<content type="html" xml:base="https://tarou.kazelog.jp/win/">
<![CDATA[
<div xmlns="http://www.w3.org/1999/xhtml"><h3><span style="text-decoration: underline;"><span style="font-size: large;"><strong>じゃがいも種の準備</strong></span><br /><br /></span></h3>
<p>2月も中旬になりそろそろジャガイモの植え付けをと準備して決行しました。<br />まずわ植え付けするジャガイモの種を準備してと家にあるじゃがいもを240グラム1個と80グラム1個。240グラムは大きすぎるので4つにカットしました。<br />じゃがいもにはおへそがあるの知っていますか？<br />だいたい芽が出始めたじゃがいもは目と反対がおへそらしいのですが。<br />見ると少し凹んだ部分があります。おへそは植えるときに下にします。<br />カットする目安はだいたい50ぎラムくらいになる様にだそうです。<br /><span style="background-color: #ff99cc;">切ったじゃがいもが植えた後に腐らない様に切り口に灰を付けるとよく言いますが、これは賛否両論あるみたいです。一番確かなのは切り口を乾かすことです、切り口から液がどんどん流れだしている状態は人間でも頂けません。</span><br />そのため本当なら2日～3日乾燥させると良いそうです。<br />今回はじゃがいもを切ったらキッチンペーパーで押さえてそのあとはそのまま3時間くらい放置しました。<br />3時間経つと切り口は乾いていました。</p>
<p><a href="https://tarou.kazelog.jp/.shared/image.html?/photos/uncategorized/2025/03/02/0214_01.jpg" onclick="window.open( this.href, '_blank', 'width=1200,height=900,scrollbars=no,resizable=no,toolbar=no,directories=no,location=no,menubar=no,status=no,left=0,top=0' ); return false"><img class="asset  asset-image at-xid-photo-59835811" style="width: 320px; display: block; margin-left: auto; margin-right: auto;" title="0214_01" src="https://tarou.kazelog.jp/win/images/2025/03/02/0214_01.jpg" alt="0214_01" /><br /></a></p>
<h3><span style="text-decoration: underline;"><span style="font-size: large;"><strong>植え付け場所準備と植え付け</strong></span><br /><br /></span></h3>
<p>植え付けの前にコイン精米所へ米ぬかをもらいに行ってきました。(米ぬかご自由に・・・)<br />植え付ける場所は先日設置したレイズドベットの半分を使ってじゃがいまの植え付けです。<br />初めに植え付ける部分に精米所でもらってきた米ぬかを軽～くまいて、まいたら表面の土とかき混ぜます。(米ぬかがポイント)<br />米ぬかが土と良くなじんだところで40センチ～50センチ間隔にジャガイモの種を植えていきます。<br />植え方はじゃがいもの「おへそ」の方向を下にして植えます。(芽とは違い少し凹んでいます)<br />植える間隔が40センチ～50センチと言うのは、じゃがいもが成長して枝が隣同士邪魔しない程度と言うことです。</p>
<p><a href="https://tarou.kazelog.jp/.shared/image.html?/photos/uncategorized/2025/03/02/0214_02.jpg" onclick="window.open( this.href, '_blank', 'width=640,height=480,scrollbars=no,resizable=no,toolbar=no,directories=no,location=no,menubar=no,status=no,left=0,top=0' ); return false"><img class="asset  asset-image at-xid-photo-59835812" style="width: 320px; display: block; margin-left: auto; margin-right: auto;" title="0214_02" src="https://tarou.kazelog.jp/win/images/2025/03/02/0214_02.jpg" alt="0214_02" /></a></p>
<p>最後に土を掛けて終了です。<br />植え付け後の水やりは不要です。<br />じゃがいもは植えてから約1ヵ月から1ヵ月半程度で発芽します。<br />芽が出てから水やりを行いその後は土が乾いているようなら水やりを行います。<br /><br />以上じゃがいもの植え付けでした。</p>
<h3><span style="font-size: large;"><strong><span style="text-decoration: underline;">水耕栽培新情報</span></strong></span></h3>
<p><a href="https://tarou.kazelog.jp/.shared/image.html?/photos/uncategorized/2025/03/02/0214_04.jpg" onclick="window.open( this.href, '_blank', 'width=1200,height=900,scrollbars=no,resizable=no,toolbar=no,directories=no,location=no,menubar=no,status=no,left=0,top=0' ); return false"><img class="asset  asset-image at-xid-photo-59835818" style="width: 320px; display: block; margin-left: auto; margin-right: auto;" title="0214_04" src="https://tarou.kazelog.jp/win/images/2025/03/02/0214_04.jpg" alt="0214_04" /></a></p>
<p>ダイソーで上の写真の様な物を見つけました。(魔女の帽子？)<br />製品名は「鉢底ネット」で鉢の底に置いて水はけ・通気性を良くするための物らしいです。<br />ひっくり返せば水耕栽培にもと書かれていました。<br />ペットボトルで水耕栽培する時に便利かも。<br />ペットボトルでやる場合に土が下に流れたり、苗ごと下にずり落ちたりするのを防止出来そうです。</p></div>
]]>
</content>


    </entry>
    <entry>
        <title>ずぼらなニンニク冬対策</title>
        <link rel="alternate" type="text/html" href="https://tarou.kazelog.jp/win/2025/01/post-a894.html" />
        <link rel="replies" type="text/html" href="https://tarou.kazelog.jp/win/2025/01/post-a894.html" thr:count="0" />
        <id>tag:app.kazelog.jp,2003:post-59948144</id>
        <published>2025-01-02T15:53:29+09:00</published>
        <updated>2025-01-02T16:03:59+09:00</updated>
        <summary>去年収穫したニンニクが次から次えと芽が出てきて11月に植えることにしました。連作...</summary>
        <author>
            <name>tarou</name>
        </author>
        <category scheme="http://www.sixapart.com/ns/types#category" term="野菜づくり" />
        
        
<content type="html" xml:base="https://tarou.kazelog.jp/win/">
<![CDATA[
<div xmlns="http://www.w3.org/1999/xhtml"><p><a href="https://tarou.kazelog.jp/.shared/image.html?/photos/uncategorized/2025/01/02/img_7362.jpg" onclick="window.open( this.href, '_blank', 'width=640,height=480,scrollbars=no,resizable=no,toolbar=no,directories=no,location=no,menubar=no,status=no,left=0,top=0' ); return false"><img class="asset  asset-image at-xid-photo-59776198" style="width: 100px; float: left; margin: 0px 5px 5px 0px;" title="Img_7362" src="https://tarou.kazelog.jp/win/images/2025/01/02/img_7362.jpg" alt="Img_7362" /></a>去年収穫したニンニクが次から次えと芽が出てきて11月に植えることにしました。連作が出来なくは無い、青森県の生産者はやっていると書かれていましたが極端な連作はダメとも書かれていました。<br />それなので庭畑には植えず裏庭の日陰の場所に植えておきました。それでもちゃんと芽が出てきました。でも日当たりの良い場所の方が良いのに決まっているので植え直しと霜・寒さ対策をしました。角型のプランターに植えてビニールシートで囲い込みました。<br /><br />※材料は家にあった角型のプランターと透明なゴミ袋を利用して材料代ゼロ円でした。<br /><br /></p>
<p><a href="https://tarou.kazelog.jp/.shared/image.html?/photos/uncategorized/2025/01/02/img_7363.jpg" onclick="window.open( this.href, '_blank', 'width=640,height=480,scrollbars=no,resizable=no,toolbar=no,directories=no,location=no,menubar=no,status=no,left=0,top=0' ); return false"><img class="asset  asset-image at-xid-photo-59776199" style="width: 100px; float: left; margin: 0px 5px 5px 0px;" title="Img_7363" src="https://tarou.kazelog.jp/win/images/2025/01/02/img_7363.jpg" alt="Img_7363" /></a>それでも数が足りなかったのでペットボトルを切ってその中に植えてみました。(ちょっと細すぎ)はじめはマルチを巻いて保温しようとも思ったのですがマルチ巻くのめんどくさいのでやめました。それを日当たりの良い場所へ移して様子見です。風で倒れない様にレンガで転倒防止対策をしています。</p>
<!-- START MoshimoAffiliateEasyLink -->
<script type="text/javascript">// <![CDATA[
(function(b,c,f,g,a,d,e){b.MoshimoAffiliateObject=a;b[a]=b[a]||function(){arguments.currentScript=c.currentScript||c.scripts[c.scripts.length-2];(b[a].q=b[a].q||[]).push(arguments)};c.getElementById(a)||(d=c.createElement(f),d.src=g,d.id=a,e=c.getElementsByTagName("body")[0],e.appendChild(d))})(window,document,"script","//dn.msmstatic.com/site/cardlink/bundle.js?20220329","msmaflink");msmaflink({"n":"ベジタブルプランター 480 22Lプランター 野菜用プランター 長方形プランター ","b":"","t":"","d":"https:\/\/thumbnail.image.rakuten.co.jp","c_p":"\/@0_mall\/unidy\/cabinet","p":["\/jishahin4\/221337-e.jpg","\/06956800\/enet_750750.jpg"],"u":{"u":"https:\/\/item.rakuten.co.jp\/unidy\/221337\/","t":"rakuten","r_v":""},"v":"2.1","b_l":[{"id":1,"u_tx":"楽天市場","u_bc":"#e57071","u_url":"https:\/\/item.rakuten.co.jp\/unidy\/221337\/","a_id":4821890,"p_id":54,"pl_id":27059,"pc_id":54,"s_n":"rakuten","u_so":1},{"id":3,"u_tx":"Yahoo!ショッピング","u_bc":"#6ab2d9","u_url":"https:\/\/shopping.yahoo.co.jp\/search?first=1\u0026p=%E3%83%97%E3%83%A9%E3%83%B3%E3%82%BF%E3%83%BC%20%E3%83%99%E3%82%B8%E3%82%BF%E3%83%96%E3%83%AB%E3%83%97%E3%83%A9%E3%83%B3%E3%82%BF%E3%83%BC%20480%2022L%E3%83%97%E3%83%A9%E3%83%B3%E3%82%BF%E3%83%BC%20%E9%87%8E%E8%8F%9C%E7%94%A8%E3%83%97%E3%83%A9%E3%83%B3%E3%82%BF%E3%83%BC%20%E9%95%B7%E6%96%B9%E5%BD%A2%E3%83%97%E3%83%A9%E3%83%B3%E3%82%BF%E3%83%BC%20%E9%95%B7%E6%96%B9%E5%BD%A2%20%E9%87%8E%E8%8F%9C%20%E8%8F%9C%E5%9C%92%20%E5%AE%B6%E5%BA%AD%E8%8F%9C%E5%9C%92%20%E6%A4%8D%E7%89%A9%20%E8%8A%B1%20%E5%9C%92%E8%8A%B8%20%E6%A0%BD%E5%9F%B9%20%E5%9C%9F%20%E7%94%9F%E8%82%B2%20%E6%88%90%E9%95%B7%20%E9%80%9A%E6%B0%97%E6%80%A7%20%E6%8E%92%E6%B0%B4%E6%80%A7%20%E6%94%AF%E6%9F%B1%E5%8F%96%E4%BB%98%20%E3%82%B9%E3%83%AA%E3%83%A0%20%E7%B7%91%20%E3%83%99%E3%82%B8%E3%82%BF%E3%83%96%E3%83%AB%E3%82%B0%E3%83%AA%E3%83%BC%E3%83%B3%20%E3%82%AC%E3%83%BC%E3%83%87%E3%83%8B%E3%83%B3%E3%82%B0%20%E3%82%A2%E3%82%A4%E3%83%AA%E3%82%B9%E3%82%AA%E3%83%BC%E3%83%A4%E3%83%9E","a_id":4831443,"p_id":1225,"pl_id":27061,"pc_id":1925,"s_n":"yahoo","u_so":2}],"eid":"xCJmk","s":"s"});
// ]]&gt;</script>
<div id="msmaflink-xCJmk">リンク</div>
<!-- MoshimoAffiliateEasyLink END --></div>
]]>
</content>


    </entry>
    <entry>
        <title>あぜ板で造るレイズドベット</title>
        <link rel="alternate" type="text/html" href="https://tarou.kazelog.jp/win/2024/12/post-6931.html" />
        <link rel="replies" type="text/html" href="https://tarou.kazelog.jp/win/2024/12/post-6931.html" thr:count="0" />
        <id>tag:app.kazelog.jp,2003:post-59947472</id>
        <published>2024-12-29T15:50:55+09:00</published>
        <updated>2025-02-01T09:42:10+09:00</updated>
        <summary>最近花や家庭菜園の栽培方法に「レイズドベット」と言うのがあるのを知って色々と調べ...</summary>
        <author>
            <name>tarou</name>
        </author>
        <category scheme="http://www.sixapart.com/ns/types#category" term="レイズドベット・(野菜づくり)" />
        <category scheme="http://www.sixapart.com/ns/types#category" term="野菜づくり" />
        <category scheme="http://www.sixapart.com/ns/types#category" term="雑記です" />
        
        
<content type="html" xml:base="https://tarou.kazelog.jp/win/">
<![CDATA[
<div xmlns="http://www.w3.org/1999/xhtml"><ol>
<li style="text-align: left;">最近花や家庭菜園の栽培方法に「レイズドベット」と言うのがあるのを知って色々と調べてみました。木材やブロック・あぜ板(あぜ波板)などてやるのもあるみたいです。はじめはホームセンターで材木を購入してDIYで作ろうかと思いましたが、木材は金額が高くてとても手が出せません。金額が一番安いのはあぜ板で作るのが一番安上がり(お財布にやさしい)なのであぜ板で「レイズベット」を設置することにしました。<br /><br /></li>
</ol>
<p><a href="https://tarou.kazelog.jp/.shared/image.html?/photos/uncategorized/2024/12/29/img_7340.png" onclick="window.open( this.href, '_blank', 'width=533,height=400,scrollbars=no,resizable=no,toolbar=no,directories=no,location=no,menubar=no,status=no,left=0,top=0' ); return false"><img class="asset  asset-image at-xid-photo-59773921" style="width: 100px; float: left; margin: 0px 5px 5px 0px;" title="Img_7340" src="https://tarou.kazelog.jp/win/images/2024/12/29/img_7340.png" alt="Img_7340" /></a>「レイズドベット」とは周囲の地面よりも高く盛り上げた植栽スペースです。高く盛り上げるのに回りを囲う材料として木材やブロック・あぜ板を使うのです。「レイズトベット」のメリットは土壌の改良や管理がしやすい。排水性が良い。雑草の管理が容易。高さがあるので膝・背中などの身体への負担が軽減できる。日当たりや通気性が良い。加湿が苦手な植物にも優しい。&lt;生成AI調べ&gt;<br />デメリットは材料費が掛かる(土・材料)。地面を掘らなければならない。(地面より行へば別)。<br /><br />材料費を抑える方法として土の下に剪定した木の枝や落ち葉・生ごみ(乾燥させて)などを使う方法があります。材料として安いあぜ板を使うのも良いと思います。<br />
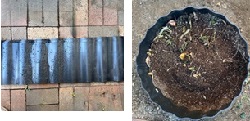
今回採用したあぜ板のサイズはW=1200、H=300を使いました。金額は1枚328円(税込み)でした。<br /><br /></p>
<p><a href="https://tarou.kazelog.jp/.shared/image.html?/photos/uncategorized/2024/12/29/img_7336_2.jpg" onclick="window.open( this.href, '_blank', 'width=500,height=373,scrollbars=no,resizable=no,toolbar=no,directories=no,location=no,menubar=no,status=no,left=0,top=0' ); return false"><img class="asset  asset-image at-xid-photo-59773965" style="width: 100px; float: left; margin: 0px 5px 5px 0px;" title="Img_7336_2" src="https://tarou.kazelog.jp/win/images/2024/12/29/img_7336_2.jpg" alt="Img_7336_2" /></a>今回はじめて「レイズドベット」を設置するのにあたって必要な物は以下の通りです。①シャベル②スコップ③長靴④ゴム手袋⑤スケル(寸法を測る)⑥あぜ板⑦培養土⑧追肥⑨段ボール<br />金額を抑えるために最近伐採した植木を30cm程度に切ったものを下に埋めて長期的な肥料化を図りました。</p>
<p><a href="https://tarou.kazelog.jp/.shared/image.html?/photos/uncategorized/2024/12/29/img_7337.png" onclick="window.open( this.href, '_blank', 'width=500,height=666,scrollbars=no,resizable=no,toolbar=no,directories=no,location=no,menubar=no,status=no,left=0,top=0' ); return false"><img class="asset  asset-image at-xid-photo-59773972" style="width: 100px; float: left; margin: 0px 5px 5px 0px;" title="Img_7337" src="https://tarou.kazelog.jp/win/images/2024/12/29/img_7337.png" alt="Img_7337" /></a><a href="https://tarou.kazelog.jp/.shared/image.html?/photos/uncategorized/2024/12/29/img_7341.png" onclick="window.open( this.href, '_blank', 'width=500,height=666,scrollbars=no,resizable=no,toolbar=no,directories=no,location=no,menubar=no,status=no,left=0,top=0' ); return false"></a>作業手順は場所を決めてスケールで位置だしを行いもくもくとスコップで穴を掘ります。今回下に植木の伐採した枝などを入れるため深めに掘りました。地面より約20cm程度掘り平らにならしてから段ボールを敷きました。(たぶん草が生えない様に?)その上に土を敷いてそのまた上に伐採した木や枝・枯れ葉を敷き詰めて足で踏んでできるだけ平らにします。(写真はありません)<br />ある帝都抑えられたらその上に土を持っていきます。この時に米ぬかを撒くとより一層枯れ葉や木が早く土肥料になるそうです。(今回は間に合いませんでした)。私は培養土と追肥・発生土を混ぜてあぜ板の10cm下場まで土を入れました。枯れ葉を入れて踏み固めた時にあぜ板を少し引き上げたので地面より20cm位の所にあぜ板のてっぺんが来ています。(いい写真が無くてすみません)</p>
<p><a href="https://tarou.kazelog.jp/.shared/image.html?/photos/uncategorized/2024/12/29/img_7341_2.png" onclick="window.open( this.href, '_blank', 'width=500,height=666,scrollbars=no,resizable=no,toolbar=no,directories=no,location=no,menubar=no,status=no,left=0,top=0' ); return false"><img class="asset  asset-image at-xid-photo-59773981" style="width: 100px; float: left; margin: 0px 5px 5px 0px;" title="Img_7341_2" src="https://tarou.kazelog.jp/win/images/2024/12/29/img_7341_2.png" alt="Img_7341_2" /></a>出来上がった「レイズドベット」へ小松菜・春菊・玉ねぎへ植えてビニールトンネルを設置して完成です。ビニールトンネルは結露などを防ぐために穴をあけました。スチールの缶をバナーであぶってビニールに押し当てると綺麗に開くネットに書いてあったのですがアルミ缶でやったらうまく行きませんでした。アルミは直ぐに温度が下がっちゃうみたいです。<br />注意・ビニールトンネルが風邪で飛ばない様にビニールと支柱を止めておくプラスチックのクラークトンネルパッカーと言うのがあるのですが取り付けにコツがいります。斜めに抑えると差し込みやすいです。<br /><br />※材料費　あぜ板 W=1200&nbsp; H=600 ×4枚 1,312円,培養土25L 1袋 598円,　追肥　458円×0.5袋 299円,ビニールシート 700×4000 1,390円</p>
<!-- START MoshimoAffiliateEasyLink -->
<script type="text/javascript">// <![CDATA[
(function(b,c,f,g,a,d,e){b.MoshimoAffiliateObject=a;b[a]=b[a]||function(){arguments.currentScript=c.currentScript||c.scripts[c.scripts.length-2];(b[a].q=b[a].q||[]).push(arguments)};c.getElementById(a)||(d=c.createElement(f),d.src=g,d.id=a,e=c.getElementsByTagName("body")[0],e.appendChild(d))})(window,document,"script","//dn.msmstatic.com/site/cardlink/bundle.js?20220329","msmaflink");msmaflink({"n":"あぜ板なみ1240 ×10枚セット","b":"","t":"","d":"https:\/\/thumbnail.image.rakuten.co.jp","c_p":"\/@0_mall\/nogyoya\/cabinet\/shizai","p":["\/5902439x10_re.jpg","\/5902439x10.jpg"],"u":{"u":"https:\/\/item.rakuten.co.jp\/nogyoya\/5902439x10\/","t":"rakuten","r_v":""},"v":"2.1","b_l":[{"id":1,"u_tx":"楽天市場","u_bc":"#e57071","u_url":"https:\/\/item.rakuten.co.jp\/nogyoya\/5902439x10\/","a_id":4821890,"p_id":54,"pl_id":27059,"pc_id":54,"s_n":"rakuten","u_so":1},{"id":3,"u_tx":"Yahoo!ショッピング","u_bc":"#6ab2d9","u_url":"https:\/\/shopping.yahoo.co.jp\/search?first=1\u0026p=%E3%81%82%E3%81%9C%E6%9D%BF%E3%81%AA%E3%81%BF1240%20%C3%9710%E6%9E%9A%E3%82%BB%E3%83%83%E3%83%88","a_id":4831443,"p_id":1225,"pl_id":27061,"pc_id":1925,"s_n":"yahoo","u_so":2}],"eid":"0gphj","s":"xs"});
// ]]&gt;</script>
<div id="msmaflink-0gphj">リンク</div>
<!-- MoshimoAffiliateEasyLink END -->
<p></p>
<center>
<div style="padding: 10px; width: 485px; margin-bottom: 10px; border: 1px solid #333333;"><a href="https://amzn.to/4jy6Hq9" target="_blank" rel="noopener"><img src="https://tarou.kazelog.jp/koukoku/bed.jpg" alt="B0027WPIRY" /></a><br /><br /><span style="font-size: 1em;">Amazon <a href="https://amzn.to/4jy6Hq9" target="_blank" rel="noopener"><strong>あぜ波板でつくるローコストなレイズドベット</strong></a> </span></div>
</center>
<p></p>
<div class="button005"><a href="https://amzn.to/4jy6Hq9">Amazonで見る⇒</a></div></div>
]]>
</content>


    </entry>
    <entry>
        <title>誰もが失敗しないニンニクの栽培</title>
        <link rel="alternate" type="text/html" href="https://tarou.kazelog.jp/win/2024/12/post-893f.html" />
        <link rel="replies" type="text/html" href="https://tarou.kazelog.jp/win/2024/12/post-893f.html" thr:count="0" />
        <id>tag:app.kazelog.jp,2003:post-59943874</id>
        <published>2024-12-16T13:44:53+09:00</published>
        <updated>2024-12-16T14:25:41+09:00</updated>
        <summary>一昨年の１０月にホームセンターでニンニクを４玉買って来て庭に植えてみました。 ニ...</summary>
        <author>
            <name>tarou</name>
        </author>
        <category scheme="http://www.sixapart.com/ns/types#category" term="季　節" />
        <category scheme="http://www.sixapart.com/ns/types#category" term="野菜づくり" />
        <category scheme="http://www.sixapart.com/ns/types#category" term="雑記です" />
        
        
<content type="html" xml:base="https://tarou.kazelog.jp/win/">
<![CDATA[
<div xmlns="http://www.w3.org/1999/xhtml"><p>一昨年の１０月にホームセンターでニンニクを４玉買って来て庭に植えてみました。<br />ニンニクは植えて１週間で芽が出てきてぐんぐん育っていきました。すごい生命力です(汗)<br />下の写真は植えて１週間後と４月の様子です。</p>
<p><a href="https://tarou.kazelog.jp/.shared/image.html?/photos/uncategorized/2024/12/16/img_6690_3.png" onclick="window.open( this.href, '_blank', 'width=642,height=481,scrollbars=no,resizable=no,toolbar=no,directories=no,location=no,menubar=no,status=no,left=0,top=0' ); return false"><img class="asset  asset-image at-xid-photo-59758010" style="width: 100px; float: left; margin: 0px 5px 5px 0px;" title="Img_6690_3" src="https://tarou.kazelog.jp/win/images/2024/12/16/img_6690_3.png" alt="Img_6690_3" /></a></p>
<p></p>
<p><a href="https://tarou.kazelog.jp/.shared/image.html?/photos/uncategorized/2024/12/16/img_6573.jpg" onclick="window.open( this.href, '_blank', 'width=1200,height=900,scrollbars=no,resizable=no,toolbar=no,directories=no,location=no,menubar=no,status=no,left=0,top=0' ); return false"><img class="asset  asset-image at-xid-photo-59758011" style="width: 100px; float: left; margin: 0px 5px 5px 0px;" title="Img_6573" src="https://tarou.kazelog.jp/win/images/2024/12/16/img_6573.jpg" alt="Img_6573" /></a></p>
<p>土が乾燥したら水を撒いてあげました。今年の夏は猛暑→酷暑でほぼ毎日水やり生活でした。水のおかげかニンニクはすくすくと育っていきました。下の葉が枯れて来たので５月下旬に収穫しました。</p>
<p><a href="https://tarou.kazelog.jp/.shared/image.html?/photos/uncategorized/2024/12/16/img_6692.png" onclick="window.open( this.href, '_blank', 'width=641,height=653,scrollbars=no,resizable=no,toolbar=no,directories=no,location=no,menubar=no,status=no,left=0,top=0' ); return false"><img class="asset  asset-image at-xid-photo-59758012" style="width: 100px; float: left; margin: 0px 5px 5px 0px;" title="Img_6692" src="https://tarou.kazelog.jp/win/images/2024/12/16/img_6692.png" alt="Img_6692" /></a></p>
<p>ニンニクの球根４玉が物凄いことになってしまいました(汗)<br />写真は撮っていないのですがニンニクは収穫後に土を落とし２日～３日天日干ししてから薄皮を１枚むき、葉を三つ編み状に編んで束ねて日陰で吊るして保温します。ニンニクは連作が出来ないので注意してください。<br />ニンニクはスーパーで売られている物でも大丈夫です。植え付けはいくつも重なり合っている球根をバラバラにして１５センチ間隔で植えるだけです。是非、試してみてください。多分失敗しないと思います。</p></div>
]]>
</content>


    </entry>
    <entry>
        <title>お庭で落花生を育てる</title>
        <link rel="alternate" type="text/html" href="https://tarou.kazelog.jp/win/2024/12/post-28c9.html" />
        <link rel="replies" type="text/html" href="https://tarou.kazelog.jp/win/2024/12/post-28c9.html" thr:count="0" />
        <id>tag:app.kazelog.jp,2003:post-59941546</id>
        <published>2024-12-08T15:51:08+09:00</published>
        <updated>2024-12-16T14:25:06+09:00</updated>
        <summary>今年の夏にホームセンターで落花生の苗を買って来て宇和に植えてみました。 一昨年ニ...</summary>
        <author>
            <name>tarou</name>
        </author>
        <category scheme="http://www.sixapart.com/ns/types#category" term="野菜づくり" />
        <category scheme="http://www.sixapart.com/ns/types#category" term="雑記です" />
        
        
<content type="html" xml:base="https://tarou.kazelog.jp/win/">
<![CDATA[
<div xmlns="http://www.w3.org/1999/xhtml"><p>今年の夏にホームセンターで落花生の苗を買って来て宇和に植えてみました。<br />一昨年ニンニクを栽培して収穫が凄いことになったので今度は落花生を試してみたのですが。<br />落花生と言うと子供の頃父親が畑で毎年落花生を作っていて取れたての落花生を茹でて食べておいしかった思い出があります。アマ良くば茹で落花生を食してみようとチャレンジしたのです。</p>
<p><a href="https://tarou.kazelog.jp/.shared/image.html?/photos/uncategorized/2024/12/16/img_7198.jpg" onclick="window.open( this.href, '_blank', 'width=1200,height=900,scrollbars=no,resizable=no,toolbar=no,directories=no,location=no,menubar=no,status=no,left=0,top=0' ); return false"><img class="asset  asset-image at-xid-photo-59758100" style="width: 100px; float: left; margin: 0px 5px 5px 0px;" title="Img_7198" src="https://tarou.kazelog.jp/win/images/2024/12/16/img_7198.jpg" alt="Img_7198" /></a></p>
<p>すみません落花生を引き抜いてからの写真になります。たった４株の落花生が凄いことになっています。落花生は９月に植えて１１月頃に下葉が枯れたら収穫時期です。下葉が枯れて来たので収穫しました。<br />取れたての落花生を茹でて塩をふって食べてみたら懐かしい子供の頃の思い出が蘇りました(笑)　&lt;写真忘れました&gt;<br />落花生は収穫してから天日干しを１週間～１０日します。乾燥させた落花生は冷暗所で６か月から保存がきくそうです。<br /><a href="https://tarou.kazelog.jp/.shared/image.html?/photos/uncategorized/2024/12/16/img_7246.jpg" onclick="window.open( this.href, '_blank', 'width=900,height=1200,scrollbars=no,resizable=no,toolbar=no,directories=no,location=no,menubar=no,status=no,left=0,top=0' ); return false"><img class="asset  asset-image at-xid-photo-59758133" style="width: 100px; float: left; margin: 0px 5px 5px 0px;" title="Img_7246" src="https://tarou.kazelog.jp/win/images/2024/12/16/img_7246.jpg" alt="Img_7246" /></a></p>
<p>落花生を煎るのはどうしたらいいのか調べてみると封筒に入れて電子レンジで加熱しても良いと書かれていました。封筒に入れて500Wで３分加熱して取り出して良く混ぜてまたレンジで２分加熱したら真っ黒(汗)<br />その後２分３０秒とか下限を見ながら調整して美味しく出来ました。<br />写真は初めの黒い落花生です。<br />落花生は連作が出来ません１年～３年開けるそうです。(来年は無理か)</p></div>
]]>
</content>


    </entry>
 
</feed>
